Search This Blog

Sunday 17 August 2014

Malaysian Chicken Curry ~ style ;D

If there is one ubiquitous dish that varies from culture to another, region to family, it would have to be curry; a medley of of aromatic dry & wet spices with some sort of protein, drown in a pool of thick, harmonious, gravy thick sauce eaten with either rice, noodles, naan, bread or roti.  A dish that can cause an uproar, bitter tension between passionate curry connoisseurs or bring enemies together.  Varies in the shades of fall colours, this dish is beloved by many and eaten in endless ways.

Can I just mention, ever since 50 Shades of Grey novels went viral, the gasping page turner hidden behind newspapers read by all ladies, young and old, you can no longer say "Shades of ..fill in blank'" without insinuating the 3 trilogies.  Seriously.

So this version of curry, belongs in the shade of yellow; Malaysian style where the key ingredients used are fresh tumeric and kaffir lime leaves.  I'm no connoisseur in Malaysian Curry so this recipe is derived from various research materials, my second attempt at it which I must admit, tasted far better than my first attempt :P


Directions:
1.  Marinade 1 - 1 1/2 pound chicken wings with 1 tbsp of curry powder, salt & 1 tsp of soy sauce.  Set aside.
2.  Rinse 10-12 fresh kaffir lime leaves - found in the produce aisle of asian grocers
3.  Rinse 10 curry leaves  - found in the produce aisle of asian grocers
4.  Cube 2 small potatoes & 1 carrot stalk
5.  Have ready 1/2 cup chicken stalk & 1/2 cup coconut milk

Let's make the spice paste:
1.  In a blender: add 3 scallions
                               3 cloves of garlic
                               2 finger size each of fresh galangal & fresh tumeric root
                               2 stalks of lemongrass - white portion only - hammer the stalks with the back of the knife for a minute and mince
                               1 quarter size ginger
                               3 - 4 dried chillies
                               3 - 4 fresh thai red chillies - de-seeded
                               2 tsp shrimp paste
                               2 tsp curry powder
                               a wee bit of water

2.  Blend all ingredients until a smooth paste.  Water will homogenize all ingredients.  In a heavy bottom pot, on medium high heat, add olive oil.  Once pot is hot, add in spice paste, stir and allow the water to evaporate.  Enjoy the aroma!

3.  Once the water dries out from the paste, add in your kaffir lime leaves and curry leaves.  Stir.

4.  Add in the marinaded chicken wings.  Mix.  Ensure the paste covers every surface of the wings.  Add in your chicken stalk.  Blend. Cover the pot with a heavy lid and cook for 3 - 4 mins or until the liquid on the surface starts to bubble.

5.  Add in coconut milk, potatoes & carrot.   Stir.  Lower the heat to low. Cover and simmer for 30 - 40 mins.  Potatoes should break apart by now. :)

Enjoy with your choice of carbs:)

For lack of time, no other photos were edited, therefore this one lonesome photo (above) will be sufficient for the time being....

Enjoy the rest of your summer!


Sunday 20 July 2014

Spicy Dan Dan Mein

My hands are on fire, unable to be extinguished.  I've lavishly lathered lime juice and cold water over ever crevice of my fingers to what feels like a 2nd degree burn.  The pain jolts and sears as my fingers pounces (not so elegantly) on the keyboard, even with Keiko Matsui' smooth piano jazz playing in the background.  This time.  I only dealt with 2 red thai chilies, it's capsaicin branding every open pore of my hands.  When I had made the hot sauce to accompany the Hainanese Chicken, over 20 red thai chilies were used.  I felt as if my fingers were going to fall off.

This is where the concept of "pain & pleasure" come in play.  There's an enjoyment one cannot deny itself when it comes to consuming spicy food.  It excites our palette.  Enhances our food experiences as well as broaden food selections. It provides warm glowing sensation that coats our tummy post meal.  But if you had to prepare your own raw chilies to enhance your dish, please, do yourself a favor and wear kitchen gloves, unless of course.... you like the pain post prepping chilies.

It was during my research about various types of Japanese ramens did I come across Dan Dan Mein,(Japanese version is called "Tantanmen")  which apparently, according to social media consensus, originated from Szechuan, China; a sesame base sauce toss with noodles, topped with minced pork and vegetables on the side.  A typical road side, fulfilling street dish that requires only a pot of rolling water to cook the noodles, it's sauces and toppings pre-made by the vendor at the crack of dawn.   Upon request, a pre-fixed amount of noodle is dropped in the rolling pot of water, with smooth fluid moments, the vendor spoons in the required amounts of sauces, usually a combination of sesame paste, soy sauce, homemade chili oil with seeds, sugar, and black vinegar into the bottom of the bowl, the now cooked noodles, sieved from any excess liquid is place on top of the sauces, minced meat, green onions and vegetables topped up and served with a pair of chopsticks.  In a blink of an eye, this perfect harmony bowl of noodles is served, all you have to do is toss the noodles with the sauce with your chopsticks until every strand of noodle is coated with the sauce.  It really is that simple.  

To make the mince meat:
1/2 pound ground pork 
2 red thai chilies (optional)
1tbsp each of, chili paste, soy bean paste - if not already sweeten, add 1tsp or so of brown sugar
1tsp of grated ginger
3 cloves of garlic - finely diced
2 tbsp of pickled sichuan mustard vegetable (sold in asian groceries in small foil packs usually sold at $0.39 per pack) 
2 stalks of the white portion of green onion


1.  In a medium high pan, coat bottom with olive oil.  Once hot, throw in chilies and garlic.  toss for a few second until fragrant, throw in ginger, pickled mustard and white portion of green onion.  Toss.  Throw in minced ground pork and separate into tiny tiny bits with a wooden spatula.  When it is 3/4 cooked through, add in the soybean paste, chili paste and sugar.  Toss and coat each tiny piece of ground pork.  Cook for another 6-7 mins on medium high, constantly mincing the meat with the wooden spatula.  Once cooked, turn off the heat and set aside. 


Prepare your choice of vegetables you like.  I chose to use bak choy as the natural sweetness and texture will compliment well with the noodles when tossed with the sauce and meat.   All I did was boiled the vegetables for 1 min and shocked the cooked veg. in cold water to stop from further cooking and maintain the fresh greenness.  Over cooked vegetables will have a yellow tone to it. 

Let's prepare the sauce.  All you need is the following to make one serving.  Add sauce to bottom of a bowl.
1 tsp and a bit of sesame paste 
1 tsp of dark soy sauce 
1 tsp of soy sauce
1 tsp of sugar
1 tbsp of chili oil (add as little of as much as you like:)
1.5 tbsp of black vinegar


Boil a desired amount of noodles (dried or freshly made :)  ) into a pot of rolling water.  Cook accordingly but do not overcook.  Mushy noodles makes for an unpleasant texture. 
Strain noodles using a seive and toss in the bowl of sauce.  Top with meat and vegetables. 


Using a pair of chopsticks and a spoon, toss and coat each strand of noodles with the sauce from the bottom.  

 You are now ready to enjoy this simple simple meal:)


Tuesday 8 July 2014

Hainanese Chicken ~ Singapore style

Chicken breast, whether it is fried, breaded, grilled, steamed, boiled, stripped, cubed or shredded has no place in my fridge.  From the grocery store or on the menu of some fancy restaurant where there are at least 10 utensils before you, it's white, dense meat does not make me salivate.  In fact, my face naturally distorts itself like the "The Persistence of Memory" painting by Salvador Dali.  There was even a period of time where the moment I see some sort of chicken breast dish served at a restaurant, it would make everything else non chicken related dishes around it look displeasing.  Yes. I can be quite the drama queen. :D

So how did I ever come to love Hainanese Chicken?  I couldn't honestly tell you but I have this inking feeling it was force fed to me.  Suddenly, with a slap across the face, I shake myself out of the chicken slumber dump and thoroughly enjoy every bite this dish has to offer.

Hainanese Chicken - from "Chatterbox" Mandarin Orchard Hotel, Singapore
Originated from Hainan, China, hence the name "Hainanese Chicken" Southeast Asia like Singapore, Malaysia & Thailand has really taken this beloved dish and made it uniquely theirs.   During my travel to Singapore a year and a half ago, my first & many other meals there was none other than their famous Hainanese Chicken.  Unique to the Singaporean way of eating this dish, are the 3 sauces; the smooth spicy hot sauce, dark sweet soy sauce and the ginger/green onion oil sauce. Apparently, the usage of the sauces is individualized to personal preference.  Me? the combination of all 3 sauces together on the poached chicken with chicken stock rice is the perfect way to enjoy it.  :)

Since my daily diet lacks substantial white protein and the North American way of cooking chicken breast/meat just doesn't fancy my taste buds, I've decided to challenge my culinary skills and try out this age old dish.

This recipe is best made with naturally raised, farm fed birds since you will be able to enjoy the meat at its purest form.  If you are not fortunate like myself to slit the throat of a chicken and de-feather it, get one from your local chicken butcher shop, preferably organic.  Trust me, there will be a difference in flavour.

I purchased my beheaded chicken, legs wrapped around itself at "Sanagan's Meat Locker" Kensington Market, Toronto, it's supplier; King Capon.  If I am at all honest, after my first attempt of making this dish, I would try another supplier.  (Should you have any recommendations as to where I should purchase a fine bird in Toronto, preferably plucked and beheaded. drop me a msg)

dirty birdy :S
Directions in preparing the chicken:
1.  Soak the whole chicken in a bath of generous amount of salt water.  Using salt, scrub at every crevice of the chicken, cleaning and plucking out any unwanted hair.  Rinse under cold water and repeat scrubbing until satisfactory.

clean birdy :D 

2.  Stuff the clean bird with a handful of full stalk green onions and 3-5 finger size ginger.

3.  In a pot, fill with cold water halfway, add 3 finger size ginger and 4 cloves of garlic.  Submerse your stuffed bird into the cold bath.  Turn the heat to medium high.  Once you see soft rolling bubbles on the surface, quickly turn the heat down to low.  Simmer on low for 35 - 40 mins with the lid of the pot slightly off the surface allowing heat to escape.  You are essentially poaching your chicken in the aromatic broth now.

4.  When the time is almost up, prepare a bucket of ice bath.  Gently take out the chicken from the pot and quickly dump it in the ice bath and leave it submersed for at least 5-10mins. This way, the skin and the fat under the skin will gelatinize, adding to the silken texture of the meat.

ice bird ;D 
5.  Bring out your clever and chopping board.  Place the chicken on the board and chop off the legs and wings from the body and place them onto serving plate.  Next, chop the body lengthwise down the middle into two halves.  Chop each halve into 2 halves lengthwise and chop into pieces opposite direction.  Repeat for all halves.  Please excuse the photos as I had to resort to my iphone camera since I was on a time crunch.

cooked birdy :D 

chopped birdy :D 
6.  Taste test the meat on its own, unadulterated version.  You'll understand why a high quality chicken is preferred for this dish. :) Set aside.

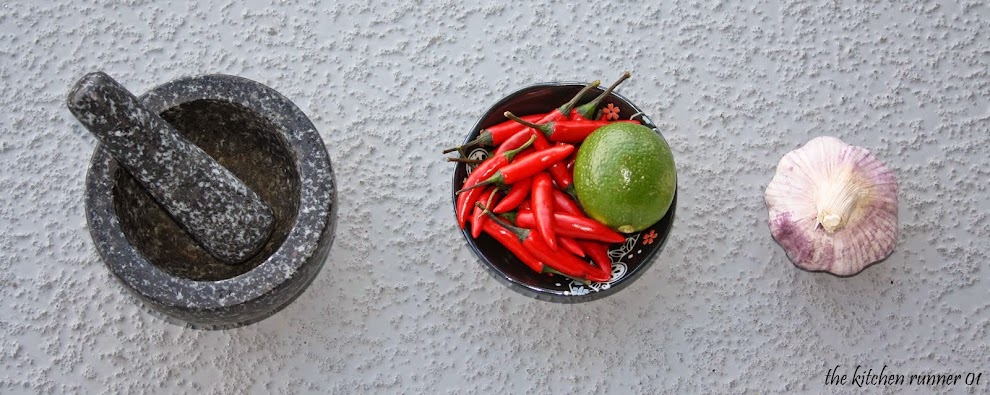
7.  While the chicken is poaching, prep the ingredients required to make the 3 sauces and rice as shown in the photo below.


8.  Soy Sauce:  In a small sauce pan on medium low heat, add 1/4cup of dark soy sauce and 1tsp of white sugar.  Stir with a spatula until sugar is dissolved. Once you start to see smoke, turn off the heat and transfer sweeten dark soy sauce to a small bowl.

9.  Chili Sauce: In the same pan, on medium heat, add 3-4tbsp of vegetable oil.  Once oil is hot, add in garlic, chili and scallions.  Cook for 5 - 7 mins.  Transfer all ingredients to a blender and blend until it becomes a smooth consistent paste.  Add a little bit of water to aid its smooth consistency.   If you wish, strain the sauce through a cheese cloth for a smoother texture.

10.  Ginger & Green Onion Sauce: In a clean pan on medium high heat, coat bottom of pan with 1/4 cup of vegetable oil.  Once oil is hot, add in grated ginger and toss until fragrant, for 2 mins.  Add in green onion, dash of salt and white pepper.  Cook for another 2 -3 mins.

Note: No recipes were followed to make the sauces, it was more of an intuiative thing so feel free to change up the ingredients to your own taste.

You now have all 3 sauces ready!  Let's make the rice.

11.  To make the chicken flavoured rice, you'll need to soak 2 cups of rice for 1/2hr in water.  This will allow the chicken stock infuse into rice quicker during the cooking process.

12.  In a heavy bottom pot, medium high heat, add in your chicken fat and coat the bottom of pan.  Once it starts to sizzle, add in diced scallions.  Cook until fragrant and add in a dash of white pepper.  Drain the soaked rice well and toss into pan.  Toss and cook for 2mins.  Pour in 2 cups of chicken stock from the pot used to poach the chicken.  Cover.  Once it begins to bubble on the top surface, quickly turn down the heat to low and allow to steam with the lid completely on pot for 18-20mins.  Do not uncover during this time as the moisture will escape and rice will be not cook evenly.


must keep pot covered to cook rice evenly
9.  Turn off the heat once rice is done.  The rice will be semi-translucent, like so.


Let's plate and eat :)


Note:  Sauces made serves about 5 - 6 people and can be kept, each in its sealed container for up to 2 weeks in the fridge.


Saturday 28 June 2014

Natto on Rice ~ Fermented Soy Bean

It's a well known fact, I live vicariously through Anthony Bourdain since his days on "A Cook's Tour" back in yup.....2001.  He who has THE perfect job, THE perfect crew to work with, THE perfect reason to wake up day after day to make discoveries that has and continue to shaped his worldly political views.  What he and his production team brings to screen both inspires and educates many. Truth be told, it was through following his food adventures that sparked an interest broadening my food palette.  It was his talent with articulated words that inspired me to get back into writing.  So this food blog, true homage goes out to AB.

But my praises to him must stop for the moment.  He has disappointed me.  It is almost unforgivable.  If you are an avid follower of hi shows, you would notice he always highlights each nation's dish.  A dish originated from the country with little or no influence from other cultures.  A dish that has long history and holds iconic symbolism to the country .  In korea, he has a whole segment on the origins of kimchi.  In scotland, haggish comes into focus, even for just a few seconds.  Vietnam, bowls of 'pho' from boatside to restaurants are consumed.  Montreal, he and his french pals extend their waist line with plates of poutine from La Banquise, Montreal, Quebec.  You get the idea right?

Upon his travels to Japan, never once did he highlight their ancient old dish; Natto, fermented soy bean.  Sure he slurped his way through bowls of silken pork stock ramen and gorged on ridiculously expensive sushis but could he not have dive into this crazy old dish which dates back all the way from about 1086 AD? Sure there are several different stories documented as to how this foul stinkin', stringy fermented soybean came about but this dish is proudly loved by many Japanese individuals.  I'm sure anyone living in Japan would have been happy (and proud) to introduce this unique dish to AB!

So of course, in my crazed obsession in everything Japanese, I was curious to try this, even after watching videos of experts shoveling gooey, stringy mas of goop-like fermented soybeans with rice into their mouths.  I definitely foresee texture will be an issue. :p

So join me in my adventure!  You will be able to find Natto in the frozen section of most Asian grocery store.  Be sure to get a package that includes mustard and sauce as they also sell Natto without it.


Leave Natto package room temperature for 1-2hrs prior to eating.  Cook short grain Japanese rice accordingly.  Once the rice is cooked, open the Natto packaging.  Begin to stir/whisk the soybeans.  The more you stir, the stringier the strings get. :) yummy lookin' eh? :D


 Add both sauce and mustard.  Stir/whisk with your chopsticks.  It will get real foamy and stinky. :)


This is how Natto looks!  Ready or not, time to enjoy over a hot bowl of rice. :)


Ahhh.  Chew.  Shallow.  While the first initial taste was quite nutty from the soybean, I could not get pass the gooey texture.  The third bite got a bit harder to put down.  The texture had the consistency of slimy vomit.  This is my honest opinion.  If AB were to have tried this, I wonder, what would his reaction be?  What snarky comments would he say?  Guess we would never know since he never even gave this a chance!! Disappointed AB.  Disappointed.

An ancient old dish, which I would consider as a national dish due to its long existence and there is no other dish quite like this outside of Japan.   It was only after trying this, did I realize the consumption of Natto provide major health benefits, most notably; high in protein & iron.  (higher than a boiled egg and other cooked beans)  Check out the link I`ve included here for more information about Natto.  I may just give this dish another chance. :)  Next time, definitely adding cucumber or some sort to off-set the gooey texture :P

Wednesday 4 June 2014

Cold Japanese Soba Noodle with Men-tsuyu (dipping sauce)

There is something unique about the way how Japanese culture dedicate a lifetime in mastering their skill.  No matter its simplicity or complexity, the aura around them as they perform their artistry is truly inspirational.  To give an example, "Jiro Dreams of Sushi" is a documentary on an 85 year old man - Jiro Ono, owner of a world renown, 3 Michelin star restaurant; "Sukiyabashi Jiro" located in Ginza Chuo, Tokyo, Japan.  A prodigy in the art of sushi, he left home at the age of 9 and focused his dedication in making better sushi everyday, pushing the boundaries where possible.  Following his every move in the making of this wondrous film, the camera zero's in on his calm, quiet persona as he forms the rice portion of a sushi...just...like ....so.  The carefully picked, prepared sashimi portion is dressed ...like a painter with a dedicate purpose and finally, artfully placed on a ceramic plate purposefully designed to plate that single sushi.  It's no wonder patrons should expect to shell out $400 per person to experience just how this man transforms sushi with his skills.  If you haven't watched this film, please do so.  You'll understand what I mean. :)

Soba, translate to buckwheat, originated from Japan, so naturally, the making of soba noodles is an artistic craft, from growing fields of buckwheat, harvesting, sorting grains, grinding, to the actual making of soba noodles.  Like Jiro, there are many soba masters who has dedicated their lifetime to their art, drawing out strands of noodle, hand cut with precision.  

From the back of my poor memory, films out a scene I had watched many moons ago, a 50-60 something year old man, with no verbal narration necessary, focuses on him patiently and carefully mixing buckwheat flour, slowly adding water.  His fingers move like a well choreography dance, up and down, up and down, the dough slowly forms as the dusting of the flour dances until finally, it forms into a smooth ball of dough.  With absolute peace surrounding him, he works the dough, slowly round and round the bowl, kneading with patience into a soft cone shape.  The camera catches the airy smoke of buckwheat flour dusting onto his oversize wooden board.  Dust, dust, dust. With perfect pressure, he rounds and rounds his dough with his palms until he reaches the desired size.  Dust, dust, dust.  Without even looking behind him, his hand grabs onto a long wooden rolling pin.  He magically coax the dough into a long sheet of blanket, large enough to wrap oneself comfortably.  Dust, dust, folding one end of the sheet to another.  Dust, fold, dust, fold until it becomes a sizable block.  Using ancient tools specially made to cut soba noodles, the master takes a deep breath, and at a steady beat, he slices the soba sheets into thin, even strands only to release his breath on the last strand.  His work isn't done yet.  Like a true master, he only knows the soba's worth from the loud slurping of the noodle dipped in the men-tsuyu sauce, consumed by patrons.  

Unfortunately, in this never ending, fast pace life style we all lead, it is nearly impossible to truly enjoy soba noodles the authentic way.  Due to its sudden popularity, consumerism prevailed and dried soba noodles are available at most Asian grocery, wherever you live. Trust me, there's no dancing fingers making these noodles.  Just a whole lot of heavy duty robotic machines.  Krumping.


It is important to note, the percentage of buckwheat flour is considerably lower than the traditional, handmade ones.  Since buckwheat is gluten free, the texture becomes quite brittle so wheat flour and or tapioca flour is mixed in to create elasticity in the dough.  If you are able to find 100% buckwheat flour - dried soba noodles, amazing, if not, try to buy one with buckwheat flour listed as the first ingredient
  
So without further a due, let's make the men-tsuyu dipping sauce.  This recipe will make approximately 2-3 cups which will make at least 12-15 servings. ;) Remember, this is used as a dipping sauce and not as a soup.

Soba noodle dipping sauce aka Men-tsuyu:
Ingredients:
1 kombu (kelp) from japanese aisle of grocery store
1 bag of bonito flakes, approximate 2 large handfuls
1/4 cup soy sauce (I used my favorite soy brand as quality of soy sauce will lend itself to the dish)
1/4 cup mirin
2 cups of water
1 tbsp white sugar

Directions:
1.  In a sauce pan, add in approx. 2 cups of tap water and soak the kombu for 30mins - 1hr.  The kombu will expand, tripling its size and the flavour extracted from this is the underlining flavour of this sauce.


soy sauce, bonita flakes, mirin, sugar
2.  Once ready, turn heat to medium low and allow to slowly bring to a simmer. When you see bubbles on the bottom of the pan forming, take out the kombu.   Add in your soy sauce, mirin and sugar and continue to let it simmer until soft bubbles start to form on top. Add the bonito flakes.  Don't worry, the heat will make the slivers of bonito flakes seem like it is alive:) enjoy the show:)


3.  Simmer for another couple of minutes.  Prepare a dry, clean bowl, a strainer lined with a paper towel.  Once done simmering, slowly drain over the strainer into the bowl.  The paper towel will pick up all the bonito flakes.


4.  Squeeze out all the liquid from the pouch of bonito flakes.  Every drop counts.:)  (If you do not want to discard the used bonito flakes, save it to eat with japanese rice, or spread onto baking sheet and bake until dried and sprinkle on rice:)


5.  Allow sauce to cool, refrigerate before serving. :)  It's easy peasy here on out.  All you need to do is cook the soba noodles according to package, rinse VERY well under ice cold water, drain well and serve. :)

6.  Topics for soba noodles vary from nori (dried seaweed), wasabi, quail egg, daikon (white radish) and green onion.  I chose to keep mine super simple to enjoy the homemade men-tsu-yu sauce.


Personally, I like to mix a bit of wasabi into my dipping sauce.  To eat, hold onto the dipping sauce cup / bowl with your left hand (if you are right handed) with your chopsticks, pick up a bite size soba noodles and completely soak into dipping sauce and SLURP real loud to eat.  The whole sucking in the cheeks kinda slurp!  the sauce will dance in your mouth, coating all your sensory taste buds, thus the magic to truly enjoying soba noodles like the Japanese. :)  It has been said, if you do not slurp your noodles loudly, you are offending the chef.  By slurping obnoxiously, you are indirectly telling them, the dish is delicious. :) 

SLURP! enjoy:) my favorite summer dinner, especially on a weeknight :) 


Saturday 31 May 2014

Modernize Gyudon ~ Japanese Beef Rice Bowl

A wonderful melody of classic jazz music in combination of birds calling on one another, peppered in with the city's traffic embraces my surroundings.  For just a moment, with the seamless blue skies before me, I can't help but feel .....content.   In a whirlwind of activities, unavoidable chores and the constant necessity to keep busy, these quiet, peaceful moments are rare.  When you get these moments, embrace it.  It's good for the heart. :)  but please, get right back on the horse wagon afterwards.  Those terrifying stack of bills on your desk aren't going to pay themselves.  :)

This new spring season has kept my fridge bottom heavy with nature's best for weeks, denying my body with much needed, substantial meat.  The ones the sqwack, moo and oink....( I wonder what sort of sound a rainbow trout makes?  bubble bubble pop?)  Anyhow, let's just say, I got happy drunk on the sudden bountiful of fruits, tomatoes, sweet peppers, avocado's and my only source of protein was an egg a day.  So my body had a mind of its own and decided to teach me a lesson.  A painful lesson.  High dosage of Tylenol with CAFFEINE (who knew Tylenol had caffeine?!) pumped into the veins just to keep my nose above water kinda lesson.  

After what felt like a century, the bottle of tylenol moved its way to the back of the cupboard and I decided to turn to my favorite, trusty Japanese dish - Gyudon - Beef rice bowl. The typical Gyudon -   beef and rice with an egg on top, garnished with green onion and pickled ginger.  While that is great, my stubborn nature insisted on having a medley of vegetables with it hence, the "Modernize" version of this Gyudon.  I had written a post on this dish previously but this time around, I decide to cook it differently. So I hope you will enjoy it! Because I certainly prefer this version:)

Below are my ingredients.  Replace whatever ingredients of your choice to your liking. Just don't replace the beef, ginger and onion  :) 

Spinach, green onion, king oyster mushrooms, onion, garlic, ginger, rib-eye beef slices, sweet orange pepper.
Directions: 

1.  In sauce pan, add approximately 2 cups of green tea or water,
                                                    2 tbsp each of mirin, soy sauce
                                                    1 tbsp each of rice vinegar or apple vinegar and chicken paste
                                                    2 - 3 white portion of the green onion stalks, cloves of garlic
                                                    3 finger size ginger, more or less to your taste
                                                    3 tbsp brown sugar, more or less to your taste


 3.  Turn to medium heat and allow to simmer.


4.  Add a approx 5 slices of rib-eye beef to stock, infusing the stock with natural beef flavours.  Simmer for 20 minutes.  Strain this yummy stock, discarding the stalks, garlic and beef slices. Keep the ginger :) Set aside.


5.  As the stock simmers, prep your vegetables.  The key ingredients to a good Gyudon is; good beef slices, ginger, sugar and onion.  Thinly slice a whole onion.


6.  Prep green onion.  Slice green onion at an angle for better presentation. Soak in ice cold water.  This will extract the bitterness of the green onion and maintain its crispiness.  Drain and set aside.  To keep in the fridge at this stage, place sliced onion on a bed of paper towel in a tuberware.  Cover.  This will last for at least a week.


7.  To top this dish, I used spinach, sweet orange pepper and king oyster mushrooms.   With the spinach, I simply boiled for 1 min, drain, squeezing out all excess water and marinated with a touch of sesame oil, salt, white pepper, soy sauce and chili powder.  Sweet pepper and king oyster mushrooms were pan-fried until golden brown separately.  Set all cooked vegetables aside until plating time.


8.  In a heavy bottom pan, turn to medium high heat, coat with olive oil.  Add 1 tbsp of diced garlic and ginger and fried until fragrant.  Add in sliced onion.  Cook until almost golden brown, adding a bit of the cooked stock when necessary.

9.  Once the onion is cooked, add slice beef and cook halfway.  Then add in cooked stock.  Stir.  Turn the heat down to medium heat and allow to cook for 5-8mins.  The beef will absorb all the wonderful gingery flavours from the stock.  Personally, I prefer a more ginger flavour over the sweetness unlike most people which is why I say to adjust the ginger - sugar ratio to your taste for this particular dish.

10.  Because of the sauce for this dish, it will taste significantly better the next day, allowing the beef to marinate in its juices overnight but my body insist I feed it, so here it goes!


11.  Cook short grain Japanese rice according to package.  In a bowl, place cooked rice on the bottom and top with cooked vegetables and beef. :)


12.  Like so. :)  The combination of the spice from the ginger, sweetness from the onion and sugar is what makes this beef dish so comforting.  Enjoy!


A couple weeks ago, I had taken my new toy out for an adventure at Royal Botanical Gardens.  First time taking amateur photos outside so I leave you with the results.  New found beauty in rotten magnolia flowers:)


Wednesday 7 May 2014

Bun Thit Nu'ong + Tom - Vietnamese Rice Noodle w/t Grilled Meat & Shrimp

Unlike most cultural food where I goo-goo-ga-ga and salivate over, Vietnamese dishes is a love-hate relationship for me.  Ever so appealing and fresh to the eye but putrid in scent.  How can something look so damn good, taste amazing but stinks like.........sorry, I couldn't come up with a comparison. That's how much I hate the scent of fish sauce.  

It's only been the last few years have I been convinced, regardless of the scent, fish sauce is delicious good.    In many parts of Southeast Asia, this amber liquid stored and sold in glass jars is like soy sauce to the Japanese and Chinese.  The intensity of fermented fish liquid packs a heavy punch to the scent sensory, the first initial taste on its own......is putrid and salty.  But when diluted or cooked off in dishes, its changes to a melody of robust flavour.  I must state, while I absolutely hate the smell of fish sauce, there are others I know, who loveeeee the scent of it.  So don't let my opinion persuade you.  

Besides the oh-so-popular, "Pho" beef (+ other unknown animal parts) noodle soup that everyone loves, this "Bun Thit Nu'ong" which, as per Wikipedia means "grilled meat on rice noodles" is surprisingly my favorite.  It's a bed of vermicelli rice noodle, topped with an array of fresh mint, Thai basil, sprouts, lettuce, lime, crushed toasted peanuts, pickled radish & carrots, spring roll and your choice of meat.  Just before you dig in, spoonfuls of chili, garlic flavoured fish sauce solution is poured into the bowl and mixed.  This is when magic happens.  All 5 flavours; sweet, sour, salty, bitter & spicy come together with this dish.  The perfect balance in every bite.  Suddenly, my aversion to the putrid scent of this sauce is replaced by a new found appreciation. For those who have never had this dish before and are not familiar with fish sauce, it may take some getting use to but I guarantee, once you can get pass the scent, your tummy will be rewarded handsomely.  


As someone who rarely consume meat, I am completely in love with all the herbs and vegetables required for this dish.  We all eat with our eyes before any morsel enter into our mouth.  It further adds to the experience of food tasting.  For myself, the variety of fresh ingredients heightens my taste palette, immediately satisfying my eyes and tummy.

This dish is as simple as it looks but how you can mess up is with the fish sauce solution; the golden sauce.  The perfect balance to this solution is a smooth, balance blend of acidity, tangy, salty, sweet and spicy.  One flavour should not overpower the other but rather, enhance the "umami" to the dish.

A friend gave me the single advice that helped heighten the sauce.  If he didn't mention this tip, my sauce would have been a total failure.  Mortar and pestle.  There is something about smashing the shit out of fresh ingredients together in a mortar that a knife cannot do.  The juices from each ingredient is unreal as the pestle hits the mortar, to the beat of a fast, steady drum.


So let's make the Fish sauce solution:

Ingredients:
3 cups water
1/4 cup fish sauce x 3 (3/4 cup) I used the 1:3 ratio measurement
3 tbsp sugar
1 lime
6-7 cloves of garlic
3 thai chili

Directions:

1.  In the mortar, add garlic, chili and the zest of one lime.


2.  Smash the shit out of it.  Squeeze the juice of half a lime to the mortar and thrown in a wedge.  Continue smashing, releasing the wonderful aromatic flavours.  :) It will smell wonderful. Take out the wedge of lime and set aside.


3.  In a medium size sauce pan, at medium low heat, add in water and sugar.  Stir.  Once the sugar is dissolved, add in your fish sauce.  Don't turn the heat any higher.  You should slowly allow the solution to heat up, without the lid.  Once you start to see small bubbles at the bottom of the sauce pan, turn off the heat.

4.  You will need some sort of glass jar with a lid to hold the solution.  I used 2 - 500ml mason jars, divided the "meat" from the mortar into the 2 jars.  Pour the fish sauce solution, evenly distributing the solution between the 2 jars.  Allow to cool without the lid.  Cover only when it is completely cooled.  The longer you allow the solution to marinade with the smashed garlic, chili and lime, the tastier it will get.  -  Solution can last up to 2 weeks.

With the solution completed, let's prepare the noodles and its toppings.  At any asian grocer, you will find in the dried noodle section, a huge variety of rice noodles by different brands and countries.  I'm a firm believer in quality so, purchase the rice vermicelli - Rose brand.

Directions to cook noodle:

1.  In a big pot, fill 3/4 with warm water.  Return to stove on low - medium heat.  Completely soak the rice vermicelli and allow the water to slowly warm up.  Do not force the heat.  Simply allow the noodles to soften on its own, slowly.  Do not cover.  If you force the noodles to cook faster, you will be left with a pile of broken mush noodles.  We don't want that.  Once you start to see steam from the water, turn off the heat and simply allow the noodles soak until completely soften and pliable.  Immediately drain off the water and rinse with cold water several times.  Set aside.

Let's prepare the toppings:

Ingredients:
-bouquet of mint, thai basil
-sprouts 
-lettuce
-green onion
-pineapple (in replacement of the typical pickled carrots and radish)
-your choice of grilled meat (I used my favorite Viet sausage Nem Nu'ong - honey garlic pork sausage)
-lime

- in a pan, on high heat, "grill" the pineapple and meat until golden brown.


As an extra treat, I had chosen to add tiger shrimp. :) So I simply marinated the shrimp with a blend of olive oil, lime, salt, white pepper, 2 crushed Thai chili, 2 crushed & smashed garlic cloves and 1 and a bit tbsp soy sauce.  Pan fried on high heat for 1 and 1/2 minute on each side with the lid covered.  The smoke from the pan will further create a nice smoky flavour to the shrimp.


It's time to plate!!  Rinse herbs and vegetables and pat dry.  In a medium size noodle bowl, line with lettuce and rice noodle.  Arrange all sprouts, mint, thai basil, green onion, grilled pineapple, shrimp and meat.  Once ready to eat, pour a desired amount of the fish sauce solution (I usually use a little less than 1/2 cup).  Mix.  Toss and enjoy!!!